Introduction
This is the first post in a number of posts designed to look at using distributed file systems for use from PHP. MogileFS (https://code.google.com/p/mogilefs/) is the first one I will look at. From initial research the pros of MogileFS are as follows:
- Easily distributed
- Simple to setup/administer
- Different classes of files
- No single point of failure (although the MySQL database needs to be mirrored)
- Well tested in production
The cons:
- Files aren’t really file system accessible (uses HTTP)
Terminology/Components
It took me a little while to grasp the concepts of the mogileFS components, and therefore I thought I would write my own understanding on them here.
- Database – Usually MySQL, all trackers point to it
- Tracker – Interface for interacting with mogile
- Storage Node – Where the files are stored
- Domains – A ‘namespace’ of where files are kept, think buckets, or ‘root’ folder
- Keys – A ‘filename’ can be anything, but gives files their names
- Classes – Class for files, mainly gives retention policy (number of devices or hosts to backup onto)
MySQL Database
You will have one MySQL database and it’s up to you backup/distribute make this high availability. All trackers need to point to this ONE MySQL database.
Tracker (mogilefsd)
You want to have at least 2 trackers, and these point to the MySQL database above. The app ‘talks’ and makes requests to the trackers and they carry out tasks, such as distributing the load, doing the file system checks, and making sure the hosts and devices are online.
Storage Node (mogstored)
The storage node can be separate computers, and are made up of hosts (the program that takes commands, etc), and the ‘devices’ that are stored. You can (and probably should) have multiple devices on each storage node, these can be separate disks, folders, partitions, etc. You do NOT need RAID, and can use any file system you wish for the underlying storage (will use ext4 in these examples). You add hosts, and then devices to these hosts as you go.
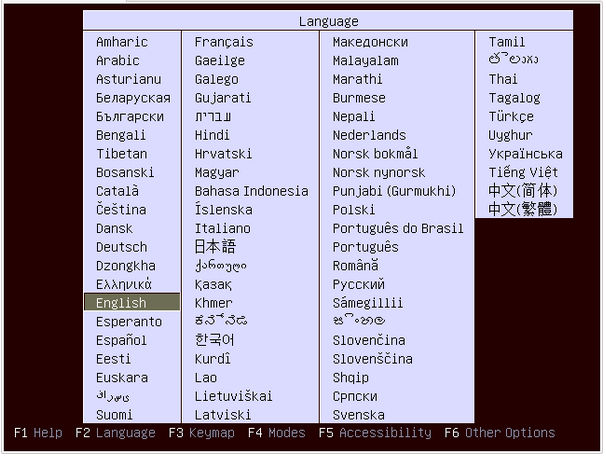
The test setup
I am going to create a test system on 2 virtual hosts as follows:
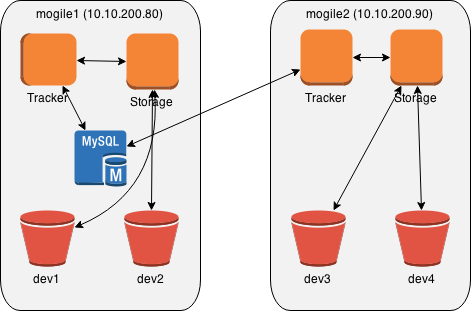
I will install mogile1 first, add some files, and then bring up mogile2, and hopefully the files should sync between the two systems.
The hosts file on both of the systems are as follows:
127.0.0.1       localhost

10.10.200.80    mogile1

10.10.200.90    mogile2
mogile1 – Install MySQL
This is probably the easiest part of the process.
$ sudo apt-get install mysql-server
Once installed, I then, modified the /etc/mysql/my.cnf and changed the bind-address to 0.0.0.0, so that mogile2 can access later, and then restart mysql:
$ sudo service mysql restart
Next is to create the database we’ll use with the user to access it.
mysql> create database mogilefs;

Query OK, 1 row affected (0.00 sec)
mysql> GRANT SELECT,INSERT,UPDATE,DELETE,CREATE,ALTER ON mogilefs.* TO mogileuser@localhost IDENTIFIED BY 'secret';
Query OK, 0 rows affected (0.00 sec)
mysql> GRANT SELECT,INSERT,UPDATE,DELETE,CREATE,ALTER ON mogilefs.* TO mogileuser@'10.10.200.%' IDENTIFIED BY 'secret';
Query OK, 0 rows affected (0.00 sec)
mysql> FLUSH PRIVILEGES;
Query OK, 0 rows affected (0.00 sec)
And that’s the end of setting up the database from the mysql point of view.
Installing the tracker, and storage nodes
Instead of a large install process, there are PPA’s out there including what you need for debian/ubuntu. The following steps will install the tracker, storage and utility parts of the system:
$ sudo add-apt-repository ppa:saz/mogilefs

$ sudo apt-get update

$ sudo apt-get install mogilefsd mogstored mogilefs-utils
This will install a load of items, but fail during install on mogilefs-util, this can be rectified by:
$ sudo apt-get install -f

$ sudo apt-get upgrade
There is an issue with the version of Syscall.pm (Syscall perl module), that comes with Ubuntu 14.04, the version 0.25 needs to be patched with the file here: Syscallpatch.txt:
$ sudo -i

$ cd /usr/share/perl5/Sys

$ wget http://www.fun-ideas.co.uk/wp-content/uploads/2015/05/Syscallpatch.txt

$ patch Syscall.pm Syscallpatch.txt

$ exit
Setup the default configurations with the following:
$ sudo dpkg-reconfigure mogilefsd

$ sudo dpkg-reconfigure mogstored
I used the defaults for these. It sets up the files in /etc/mogilefs/. Update the /etc/mogilefs/mogilefsd.conf file, and update the db_dsn, db_user, db_password, and listen host/port (so that it’s 0.0.0.0 so that other programs can connect).
Next step is to setup the database tables, using the mysql authentication details from above, we are using one of the utlities to create the database called mogdbsetup.
$ sudo mogdbsetup --dbhost=mogile1 --dbname=mogilefs --dbuser=mogileuser --dbpassword=secret
The database is then created. Start the deamon, and check it’s working:
$ sudo service mogilefsd restart

Restarting mogilefsd: mogilefsd.

$ mogadm check

Checking trackers...

  127.0.0.1:7001 ... OK
Checking hosts...
No devices found on tracker(s).
Hopefully you see the same as the above.
Configuring and adding the storage node
Lets create two ‘devices’ to use for storing the files. Normally these would be different partitions/drives, but in this instance for test purposes we’ll just create two folders in /var/mogdata/:
$ sudo mkdir /var/mogdata/dev1

$ sudo mkdir /var/mogdata/dev2

$ sudo chown mogstored /var/mogdata/*
Restart or start the storage deamon:
$ sudo service mogstored restart
Add the host, and devices to the tracker (these commands do not need to be added as root):
$ mogadm --trackers=mogile1:7001 host add mogile1 --ip=10.10.200.80 --port=7500 --status=alive
And then add the two devices we’ve made to the trackers
$ mogadm --trackers=mogile1:7001 device add mogile1 1

$ mogadm --trackers=mogile1:7001 device add mogile1 2

$ mogadm check

Checking trackers...

  127.0.0.1:7001 ... OK
Checking hosts...
[ 1] mogile1 ... OK
Checking devices...
host device size(G) used(G) free(G) use% ob state I/O%
---- ------------ ---------- ---------- ---------- ------ ---------- -----
[ 1] dev1 4.063 1.668 2.395 41.06% writeable N/A
[ 1] dev2 4.063 1.668 2.395 41.06% writeable N/A
---- ------------ ---------- ---------- ---------- ------
total: 8.126 3.336 4.789 41.06%
Domains, and adding some files
Domains are used as ‘buckets’ or the top level way of accessing files. You can create as many domains as you like. So lets add a couple of domains:
$ mogadm domain add testing

$ mogadm domain add toast

$ mogadm domain list

 domain               class                mindevcount   replpolicy   hashtype

-------------------- -------------------- ------------- ------------ -------

 testing              default                   2        MultipleHosts() NONE
toast default 2 MultipleHosts() NONE
And add some classes:
$ mogadm class add testing myclass --mindevcount=3 --replpolicy="MultipleHosts(2)"

$ mogadm class add toast myclass --mindevcount=3 --replpolicy="MultipleHosts(2)"
Let’s upload a couple of files:
$ echo "Hello world" | mogupload --trackers=mogile1:7001 --domain=testing --class="myclass" --key="/helloworld" --file="-"

$ mogupload --trackers=mogile1:7001 --domain=testing --class="myclass" --key="/mysqlconfig" --file="/etc/mysql/my.cnf"

$ $ moglistkeys --trackers=mogile1:7001 --domain=testing

/helloworld

/mysqlconfig
You can get stats as follows:
$ mogstats --db_dsn="DBI:mysql:mogilefs:host=mogile1" --db_user="mogileuser" --db_pass="secret" --verbose --stats="all"
Setting up mogile2
Install
$ sudo add-apt-repository ppa:saz/mogilefs

$ sudo apt-get update

$ sudo apt-get install mogilefsd mogstored mogilefs-utils

$ sudo apt-get install -f

$ sudo -i

$ cd /usr/share/perl5/Sys

$ wget http://www.fun-ideas.co.uk/wp-content/uploads/2015/05/Syscallpatch.txt

$ patch Syscall.pm Syscallpatch.txt

$ exit

$ sudo dpkg-reconfigure mogilefsd

$ sudo dpkg-reconfigure mogstored
Modified the /etc/mogilefs/mogilefsd.conf file, and update the db_dsn, db_user, db_password, and listen host/port (so that it’s 0.0.0.0 so that other programs can connect).
The database is then created. Start the deamon, and check it’s working:
$ sudo service mogilefsd restart

Restarting mogilefsd: mogilefsd.
Create dev3, and dev4 files in /var/mogdata and change the ownership mogstored. And add the host and devices to the trackers:
$ mogadm --trackers=mogile1:7001,mogile2:7001 host add mogile2 --ip=10.10.200.90 --port=7500 --status=alive
And then add the two devices we've made to the trackers
$ mogadm --trackers=mogile1:7001,mogile2:7001 device add mogile2 3

$ mogadm --trackers=mogile1:7001,mogile2:7001 device add mogile2 4

$ mogadm check

Checking trackers...

  127.0.0.1:7001 ... OK
Checking hosts...
[ 1] mogile1 ... OK
[ 2] mogile2 ... OK
Checking devices...
host device size(G) used(G) free(G) use% ob state I/O%
---- ------------ ---------- ---------- ---------- ------ ---------- -----
[ 1] dev1 4.063 1.669 2.394 41.08% writeable N/A
[ 1] dev2 4.063 1.669 2.394 41.08% writeable N/A
[ 2] dev3 4.063 1.585 2.478 39.01% writeable N/A
[ 2] dev4 4.063 1.585 2.478 39.01% writeable N/A
---- ------------ ---------- ---------- ---------- ------
total: 16.251 6.507 9.744 40.04%
Check that files are being added to the dev folders, and being synced between the devices.
Extra config
Instead of having to write --trackers=mogile1:7001,mogile2:7001 on all the commands, you can create a file in /etc/mogilefs/mogilefs.conf (or ~/.mogilefs.conf) containing the following line:
trackers=mogile1:7001,mogile2:7001
You can also add a domain=testing or whatever for the default domain.
Final words
This is an initial setup. Please note that all the mogilefs deamons are not security protected in anyway, and therefore should be firewalled properly from the hosts that shouldn't be able to access the files. Also the MySQL database should be replicated and backed up properly (possibly even using some of the domains).
This was a detailed installation guide, and should get you up and running. I will be creating a few more guides once I have had a play with PHP accessing the files.
References
https://code.google.com/p/mogilefs/wiki/InstallOnUbuntu
https://code.google.com/p/mogilefs/wiki/InstallHowTo
https://github.com/bradfitz/sys-syscall/issues/5